 Español
 English
How to configure Mailhelo for Exim in WHM
March 27, 2025
How to edit Reverse DNS (PTR) in WHM? “PTR is not configured correctly for this domain” means that your domain’s PTR (Pointer Record) record is not configured correctly, which can affect reverse DNS lookups and email authentication. Procedure Please note that “domain.tld”, “mail.domain.tld”, and “hostname.domain.tld” should be replaced with the email domain, the HELO hostname answer for the domain, and the server’s hostname, respectively.
Read more ›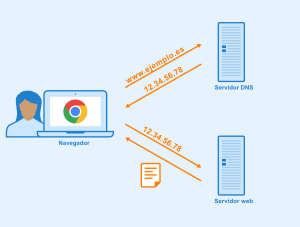
DNS server is not responding
May 22, 2024
The server is a key element to be able to access the Internet, since it translates the names of the addresses you want to access when it does not respond, is complicated or it is not possible to access websites or online services despite having an Internet connection. One of the possible solutions to this is to try another browser to see if it works correctly in it, which would indicate that the problem would be with the program we were using. Another very common solution is to restart the router by turning it off and on so that it corrects possible internal problems and works normally, thus avoiding
Read more ›
How to integrate WhatsApp into your HTML website
January 2, 2024
WhatsApp HTML code for your website In this tutorial I am going to explain in one simple step how to insert WhatsApp into your website. When someone presses the “send message” button, the corresponding application will directly open to start chatting with you. You have to create an HTML link that will open the WhatsApp application and start a conversation with the phone number that you specify. You just have to replace “0123456789”, »+12 346 678 910″ with your phone number (remember to put the international code of your country in front). Method 1: <a href="/en/»https://api.whatsapp.com/send/?phone=0123456789″">Send us a WhatsApp message</a> /* With message
Read more ›
How to integrate Telegram to an HTML website
December 26, 2023
Telegram HTML code for your website When it comes to customer communication, the first rule is to identify and use the messaging channel or channels preferred by your audience. With a Telegram website button, your Telegram contacts will be able to contact you directly from your website at any time. You have to create an HTML link that will open the Telegram application and start a conversation with the account you entered. You just have to replace “Your_Usuario” with your username. Alternative plugins to integrate Telegram into your WordPress website There are solutions
Read more ›
How to block countries by IP: Restrict access to your website by specific countries using .htaccess
May 22, 2023
Allow or block visitors from specific countries using .htaccess Once launched, a website is available worldwide. However, in many cases, it is necessary to control access to your site, especially when you want to stop spammers and hackers from certain countries. Step 1 – Generate Country IP Addresses There are many online tools available to allow or block visitors based on their country. In this tutorial, we will use country IP blocks. Step 2 – Insert the generated IP addresses into the .htaccess file Finally, paste the IP addresses of the countries you want to block or allow into the
Read more ›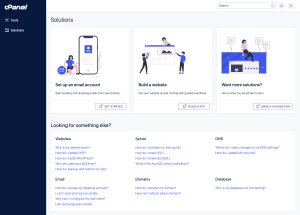
How to Create and Delete Subdomains in cPanel (Jupiter Theme)
March 14, 2023
"Additional Domains", "Aliases" and "Subdomains" were deprecated in cPanel version 100 and removed in version 106. The functionality of those interfaces was consolidated into the "Domains" interface. 106 Release Notes: Removed Addon Domains, Alias Domains, and Subdomains features Create a Subdomain in Jupiter If you are using the Jupiter theme, sign in to your cPanel account and click the Domains section: Click Create a new domain : Enter the following information: Once you are ready, click Submit : Once the subdomain is created,
Read more ›